Restoration and Improvement Project
- DIY Dad

- Mar 4, 2019
- 7 min read

My Mother-in-law has a wood/mirror accent combo piece that she doesn't really know what to do with. It's been sitting in her bathroom, on her tub ledge, not really functioning.
Very old...Very dingy...
She doesn't really know what she wants done to it. She has some ideas, but basically she wants it to serve some sort of function.
I normally don't do projects like this. I like to create something from nothing. But, in this case, since I have so much freedom, I'm going to give it a shot!
Let's get started!

So this is the piece I got.
As you can see, there's some serious wear and tear on the right. The former stain (or paint...not really sure) is coming off and really "splotchy" from age. The accent pieces at the top are starting to come off; it looks like they were just secured with shallow "pins" on the underside...maybe brad nails? Not sure...
There's a lot of uncertainty with this project so far. So the best thing to do is just dive in and start taking it apart.
The first thing I removed was the "backer board" panel from the backside. This panel was literally deteriorating from age. I'm sure it was once more firm and solid; but now, it's a soft, spongy mess. I was able to remove it just by hand; I went through and removed the nails that were left behind using needle-nose pliers and my crowbar...
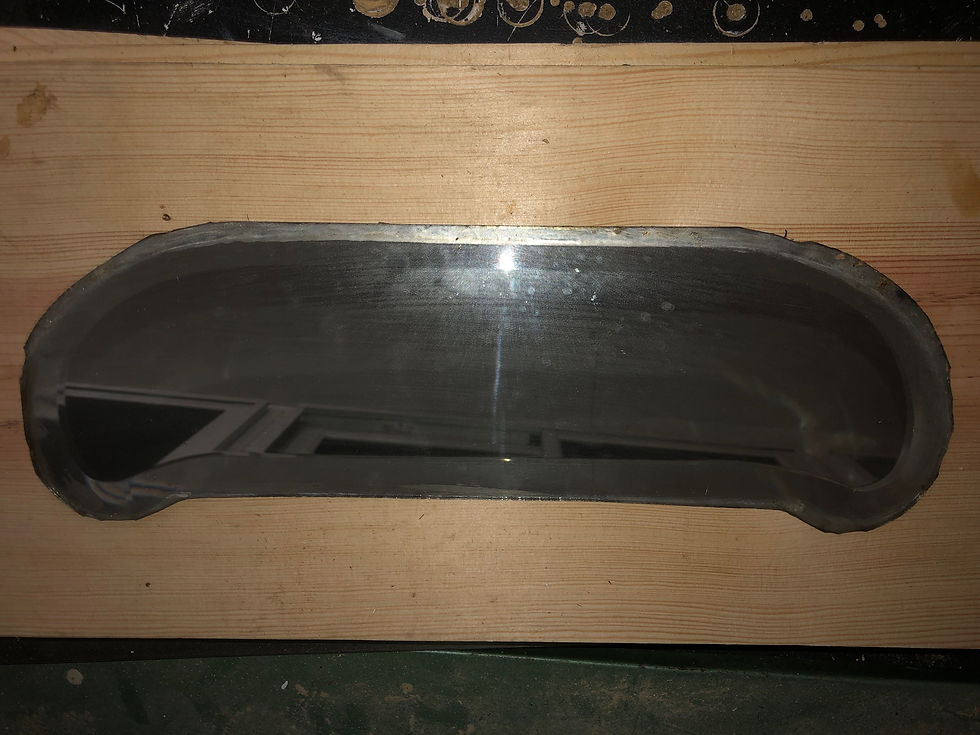

Once I removed all the backer board and nails, I was able to remove the mirror piece. I gave it a good cleaning with some Windex, and set it aside in a safe spot.
Definitely don't want to break that glass. It's the only one I've got! Plus, it's 7 years bad luck if I do!
I flipped the piece back over to see the front. I wanted to sort of "loosen up" the paint/stain on the front of the piece, so I went ahead and gave it a "light" sanding to see what I was working with...

With the light sanding using the 120-grit sandpaper by hand, it definitely stirred up the varnish on top. It pretty much changed the color completely! Maybe it's dust. Maybe it's the vanish...Either way, this tells me that I need to be more aggressive with the sanding to really get it off!
But first, I want to remove the filigree from the piece carefully so it doesn't get messed up when sanding...

whoops...
I was able to get the middle filigree(s) off in one piece. However, the thin pieces on either side were a casualty...
I kind of went at them a little more aggressively than I should have, and they split in half. Not a huge deal; I've got 3 more! Plus, I'm going to change the look of this thing up quite a bit!
As you can tell in the picture above, I lightly sanded the filigree pieces on the high points, just to give it a more rustic look.
Now that the filigree is removed, I can sand down the whole piece to it's natural wood!

I used a combination of my palm sander and my bench sander to sand this one down. It took a lot of time and elbow grease! There was some sort of "glue" on it that made a mess when it was sanded in certain spots. I also discovered some spider eggs hiding in the inset, so this thing definitely needed some TLC!
Okay, I know what I want to do at this point! I want to make this into a functional towel rack! My mother-in-law hinted at the idea and I think that's the best use for it!
Going with this new plan, I decided to add on an "extension" plank below the original piece to make it bigger. That'll give me some flexibility to do some different things.

I used what I had on hand, which was some softwood planks. I cut it to a 4" strip. Then, I cut it to length (about 37 inches) using my miter saw to match with the bottom of the original piece. I sanded it down and rounded the edges for a finished look.
Then, I lined it up and checked it out!

Looks great!
I'm not too concerned with the color difference between the woods. I plan to stain it all with a dark stain, similar to the previous finish. I think that will neutralize the difference.
Now, to attach the board to the mirror!
I went back and forth with how to attach the wood pieces. I considered wood glue, then metal brackets, etc. Then I remembered a new tool I just purchased!

I bought a Kreg Jig a couple weeks ago after deciding to try making furniture in the foreseeable future. I've been dying to try it out!
After a lot of manual reading and confirming, I calibrated the jig and drilled out the holes. I secured the softwood board to the original piece using (4) 1.5" Kreg screws.

This worked so well!
I'm really happy with the results! The joints are secure and strong without any external braces or having to wait for glue to dry!
Can't wait for the next project that I get to use my Kreg Jig!
Okay, back to the task at hand!
After admiring the joints and how well this worked, I flipped the whole piece over and took a look.

The wood lines up really nicely!
The next step was to prep for stain!
I wiped down the entire piece with a wet rag to remove all the sawdust and the other debris.
Stain time!

I decided on Minwax Jacobean stain for this one. It's very close to the previous finish. I applied the stain using a shop rag rather than a paintbrush, for that rustic look!
I let the stain dry fully before handling it.
Then, I added the filigree pieces back on to the mirror...

I adhered the filigree to the mirror using wood glue; I applied it generously, then clamped it down and let it fully dry!
Now the piece is ready for poly!

I decided on water-based gloss poly on this piece. It's a little more "shiny" than a typical antique finish would be, but I'm swinging for the fences on this one!
Plus, I'm going for an updated rustic look, which lends itself to more sheen. I brushed it on using a foam brush; it went on white and dried to a nice, shiny clear.
I let it dry for about 30 minutes before moving on to adding the external features!

I decided to put these two antique door knockers on the piece. I actually picked these out with my Mother-in-law at an antique show, and she loved them. This seems like the piece to use them on!
I secured them to the back using bolts and washers for added security.
I think they look great!
Next, I moved on to the towel hangers!

I decided on using some rustic wheel handles. My mother-in-law and I actually picked them out at the same antique show where we got the door knockers! We weren't sure what to do with them at the time, but we picked them up anyway just to be safe. Lucky me!
I think they are super appropriate for the spot where she's thinking of putting it, which is in her bathroom above her bathtub!
I spaced them out about 4 inches from each side, and about 7.5 inches between each wheel handle.

When mounting the wheel handles, I found that they needed something to further separate them from the board to have enough "hanging room" to hang things from them.
I used spare nuts that I had lying around as spacers. I drilled out the holes and then screwed the handles directly into the board, pinning them against the nuts.
That does it for the external decorations!
Now, it's time to tackle to mirror!

If you remember, the previous method of keeping the mirror in place was old and dingy. It was actually falling apart!
So, I decided on using a backer board piece that fits into the mirror opening. I traced the outline onto a piece of scrap backer board and then traced out about another 1/2" around the whole perimeter to make sure it sits in the opening properly...

After test-fitting it, I applied liquid nails to the back and clamped both pieces together.
I let it sit and dry until it was no longer moving around freely. This is just precautionary, after all because the backer board and mirror are going to be secured in a more "safe" way...

I placed the mirror and backer board into the opening and inspected the fit one last time. I used scrap backer board pieces and staples to ensure that inset stays in place. Ingenious, right?
I hung some D-rings on the backside to make it easier to hang on the wall at her house.
After a thorough Windex cleaning on the mirror, this piece is DONE!

And it looks AMAZING!
I never thought it would turn out this well! I mean, I had confidence in myself, but this exceeded all my expectations. Everything just fell into place so nicely; even the experimental, first time Kreg Jig and using pocket holes!
Once I was done, I got showered up and we headed over to my Mother-in-law's for Sunday dinner, as we normally do as part of our weekend ritual...
When I showed it to her, she was stunned. I don't think she had any idea what to expect. I know that she wasn't expecting anything like what she got. She LOVES it!
As part of my commitment to the project, I went ahead and hung it on the wall for her as well!

Absolutely beautiful!
She says it really pulls her bathroom together, and I agree! She's so excited about it, and I couldn't be happier with how it came out!
I think the thing she is most excited about is that she no longer has a useless antique sitting on her bath tub ledge, taking up space. Now, it's a fully functional towel rack and hanging mirror. Plus, it looks great too!
This goes to show: if you have something you like, but it's not really functioning, it might just be worth it to put in some time to re-purpose it! I didn't think I would enjoy doing this so much, but I really had a good time!
Stay tuned for more possible re-purposing projects in the future!
-Kevin


Comments